Somehow in all the craziness of this weekend I managed to get to the typography studio and completely finish setting my section of the story. Here's a quick tour through setting type.
The first step is to fit as many words in the line as possible (or necessary) without any space between them. This line is the end of a paragraph, so I don't have to figure out how to distribute the leftover space. You can see I've put two points of space between each word and then driven the line out-filled it up so all of the letters are tightly packed in.
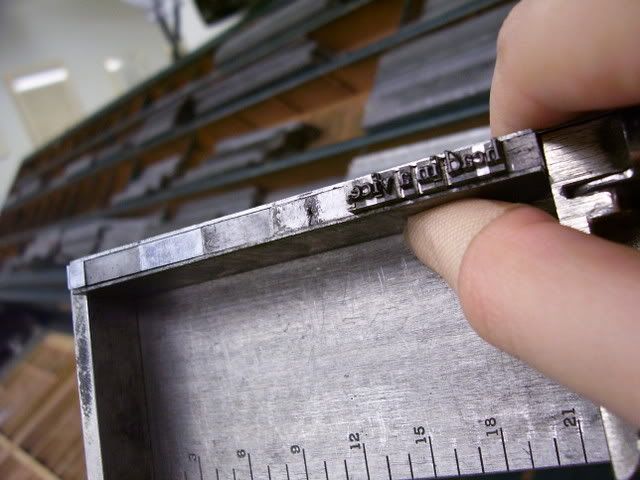
If the line had been in the middle of a paragraph, after putting even spacing between each word I would still have a little bit of wiggle room. I'd start by putting little slivers of space between combinations of straight letters, for example -d b-, -d h-, or on both sides of an I. After filling those spaces I would move to straight-curved combinations (such as -d e-) and then to all the remaining combinations of curved letters.
You can see above that the composing stick isn't long enough to set long sections of text at one go. This is a good thing; the lead starts getting heavy very quickly towards the end of a 3 hour long class. Once the composing stick is full, we tie the forme off (Old English, not a misspelling) with twine to keep letters from falling over. The next time I have a photographic assistant with me I'll get some pictures of the process. For now I can show you a finished product.
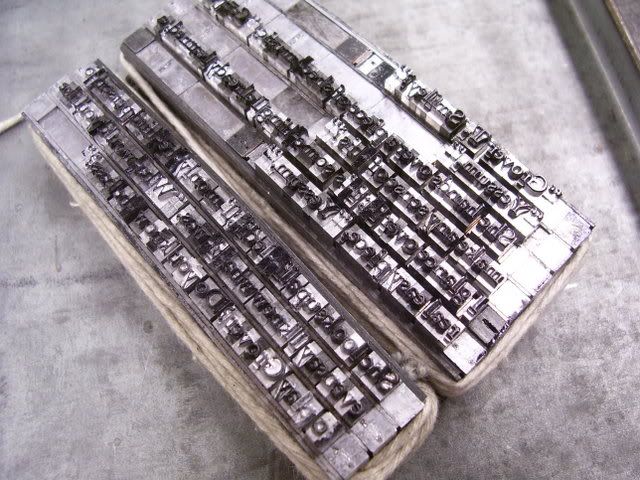
After I finished setting my section, I made a first proof with the type still tied off in smaller chunks. I've made my corrections as I've untied each section, and now I'm ready to do a second proof.


You can see at the bottom where we ran out of letters. The black rectangles are the bottoms of pieces of type; we replaced missing t's with r's, and missing e's with c's, since they are about the same width.
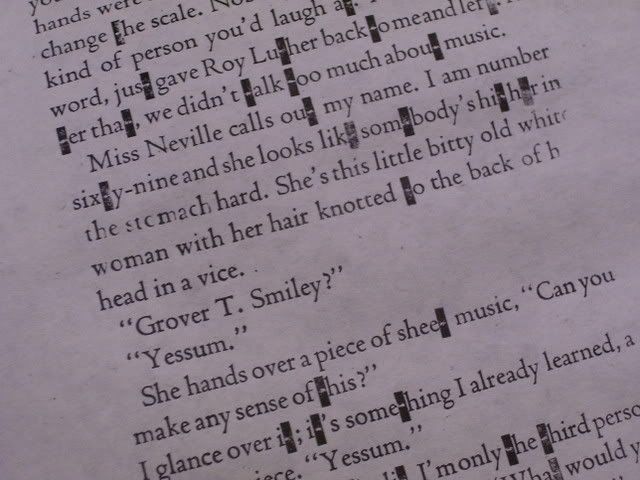
Can you find the line where I got lucky? One day when I came in a few t's had appeared in the case I was working on, but it clearly wasn't enough. The foundry did send us letters we were short on, but that wasn't enough either. The sections at the beginning and the end all have the right letters, but since I'm right in the middle I'll have to wait until they've finished printing and can start distributing type.
Tomorrow (if everyone is finished) we'll start laying out pages. So far I've been too self conscious to take pictures during class, but tomorrow should be very different from anything we've done before. I may just have to risk it.

10 comments:
Hats off to you, your instructor, and your classmates. I'm in the middle of laying out a newsletter in Quark, where adding space between letters and lines takes a few strokes with the mouse. Looking at the type you work on makes my eyes twitch - it must take infinite patience. Do you get in a 'zone' while setting? I imagine you'll need glasses when the two classes are through.
What I can't imagine is singing carols with 1000 people. It must have been exhilarating. (If I'd been there, I would have gone all weepy.)
Aww, thanks. It's not that bad setting the type; the hard part comes when you've done a proof and you're trying to decide if that e in the third line is sitting a hair too high, or if that c is from a different font, or...
It goes on and on. That's the part where your eyes get all woozy.
I think it must have a bigger impact from the audience. I'm quite a weeper myself, but during Vespers when everybody is singing together all I can hear is the organ blasting right behind us.
Oh, the continuous quilt binding tutorial is at http://heatherbailey.typepad.com/heather_bailey/. Check the sidebar. I don't know if it's going to be any different from what's in your books, but it's there if you want it.
HOLY COW! that is quite a layout. I always hate breaking down a piece like that + now that I have my own studio I can't make beginning students break it down under the guise of "learning the layout of a CA. job case." . I got the greatest tip from an amazing printer named Peter Thomas (along with his wife Donna, they make really wonderful miniature books) he told me that his method of proofing is to read it in reverse so you focus on the individual words, not the sentence. I can't tell you how many eyes looked at one piece I did + EVERYONE overlooked the word "June," I printed it as "Juue," flipping the "n."
And I cannot tell you how many broadsides I have had to print in pieces because of a lack of vowels. Registration is a pain (in the a**) on those projects.
Thank you for the info on flying with knitting needles, I also have to check to see if I can bring my Apple Laptop (exploding battery hazard?) on my upcoming flight.
Great suggestion. I learned that method from one of our first editors, and I agree, its very effective. For the kind of work you're producing, I'd highly recommend it.
Thanks for the quilt tutorial tip. I'll check out the web site.
Mums and Shona: I concur, I concur. Backwards is the best.
Shona: It's hilarious you mentioned conscripting the beginning students; that's exactly what our instructor said! It really is going to be a monster, what I've shown is only about 1/11th of the whole project. That must have been so gut wrenching when you realized about the Juue problem! A while ago I just happened to look over a friend's proof of a poem as she was about to go to press, and I almost chalked up a "climed" to poetic license in spelling. O, to liue in Elizabethean England and spelle with impunitie!
I was going to say you shouldn't worry about the lap top at all; I forgot about the whole bursting into flames issue! As long as you've checked that your battery isn't recalled I don't think it'll be a problem. I don't remember any specific instructions along the lines of "If you have a laptop, take it out of the case. If you have an Apple, show us your fire smothering blanket."
Mums: By "Check out the website" do you mean "try it out on your quilt top?" (Wink wink)
Not to pressure you or anything.
You won't believe it but... the instruction sheet wouldn't download on my computer. I can try again, but I think I'm OK with the method I have (it is the same as what she describes - continuous binding). Its the cutting I find daunting - working the math to figure out how wide to cut the binding strips (unless you remember your intent when purchasing the fabric). I still have to sign D's quilt, which is dependent on a load of laundry (ugh) so I can wash/dry/shrink the muslin first. I was disappointed that the permanent fabric marker I bought bleeds on the quilt material, and is a bear to write with to boot - it catches on the fabric - but it works ok on the muslin (unless that changes too once I've washed and dried the starch out of it). I had hoped to have an 'invisible' patch on the back, but this will have to do.
I found myself thinking of quilts as I laid out a page on the newsletter - skewing angles of text boxes and playing with their colors. Its become a mindset I should probably compartmentalize and keep at home, to get the job done quicker.
Have you bought more fabric, or are you still in the thinking about it stage? This could be dangerous!
Love the pitcher - great color.
Good luck with the book - looking forward to seeing the finished project.
wow-so this is a class-how fun! I am going to go peruse your blog and find out more!
Abby: I know, isn't it great? I'm getting credit for doing something fun. I guess all of school is supposed to be interesting, but not much of it it just plain old fun. I think what I love about it the most is figuring out how to work around the constraints of type and all of the problems that inevitably come up. I don't have that many posts about the studio right now, but as we work on our final project I plan on posting updates.
Mums: I have no idea about how wide it's supposed to be. If you take it on, whatever you decide is fine. Don't you wish permanent actually meant permanent? I'm sure the muslin will be fine. I have some fabric lying around that I've bought "just because", but nothing that really works together, so I'm still in the pre-commitment, let's just dream about quilts phase.
I just got a note from Aunt M., who offered us a quilt that my grandmother had been restoring and never got to finish, if we want to take on the project. She said its a white quilt with applique, and "she had been replacing the worn brightly flowered fabric. Some of those swatches are still around too." I've never done applique; I've only recently developed an appreciation for it. I think the local shop (in P.C.) is offering a class soon. Maybe when you're home we can go take a look at the quilt. Grandma G. was the inspiration for my interest in photography and quilts (and books -- she was the book grandma!), and my first teacher in a number of things (sewing/embroidery/chess); it might be nice to adopt her project. How do you feel about picking up where your great-grandmother left off?
That sounds really interesting. I wonder if we'll be able to find appropriate fabrics in person or if it will be easier to find fabrics online at a place like reprodepot. Do we know when the quilt was originally made/when she was restoring it?
Another thing, I'm mostly using initials when I'm talking about children. I'm going to get confused by the alphabet soup if we talk about all of our relatives in code.
Post a Comment